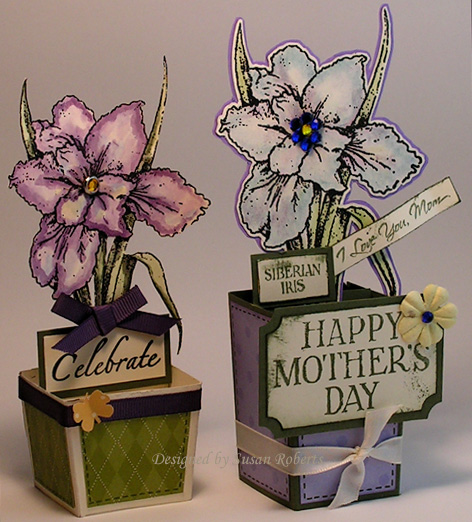
My “Siberian Iris” set from Fourishes arrived yesterday! Couldn’t wait to play with it! I made a couple of fun little baskets.
I took some pictures along the way in case anyone wants to make one, too.
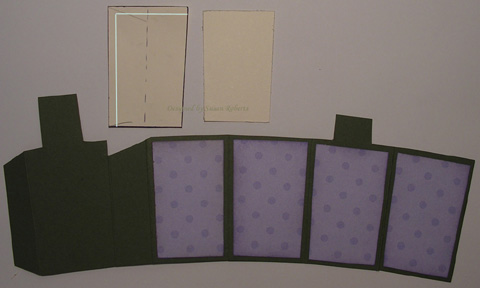
First decide what size and shape you want your “basket” to be. Here are some examples or ideas. I also included a template with each section numbered 1-7.
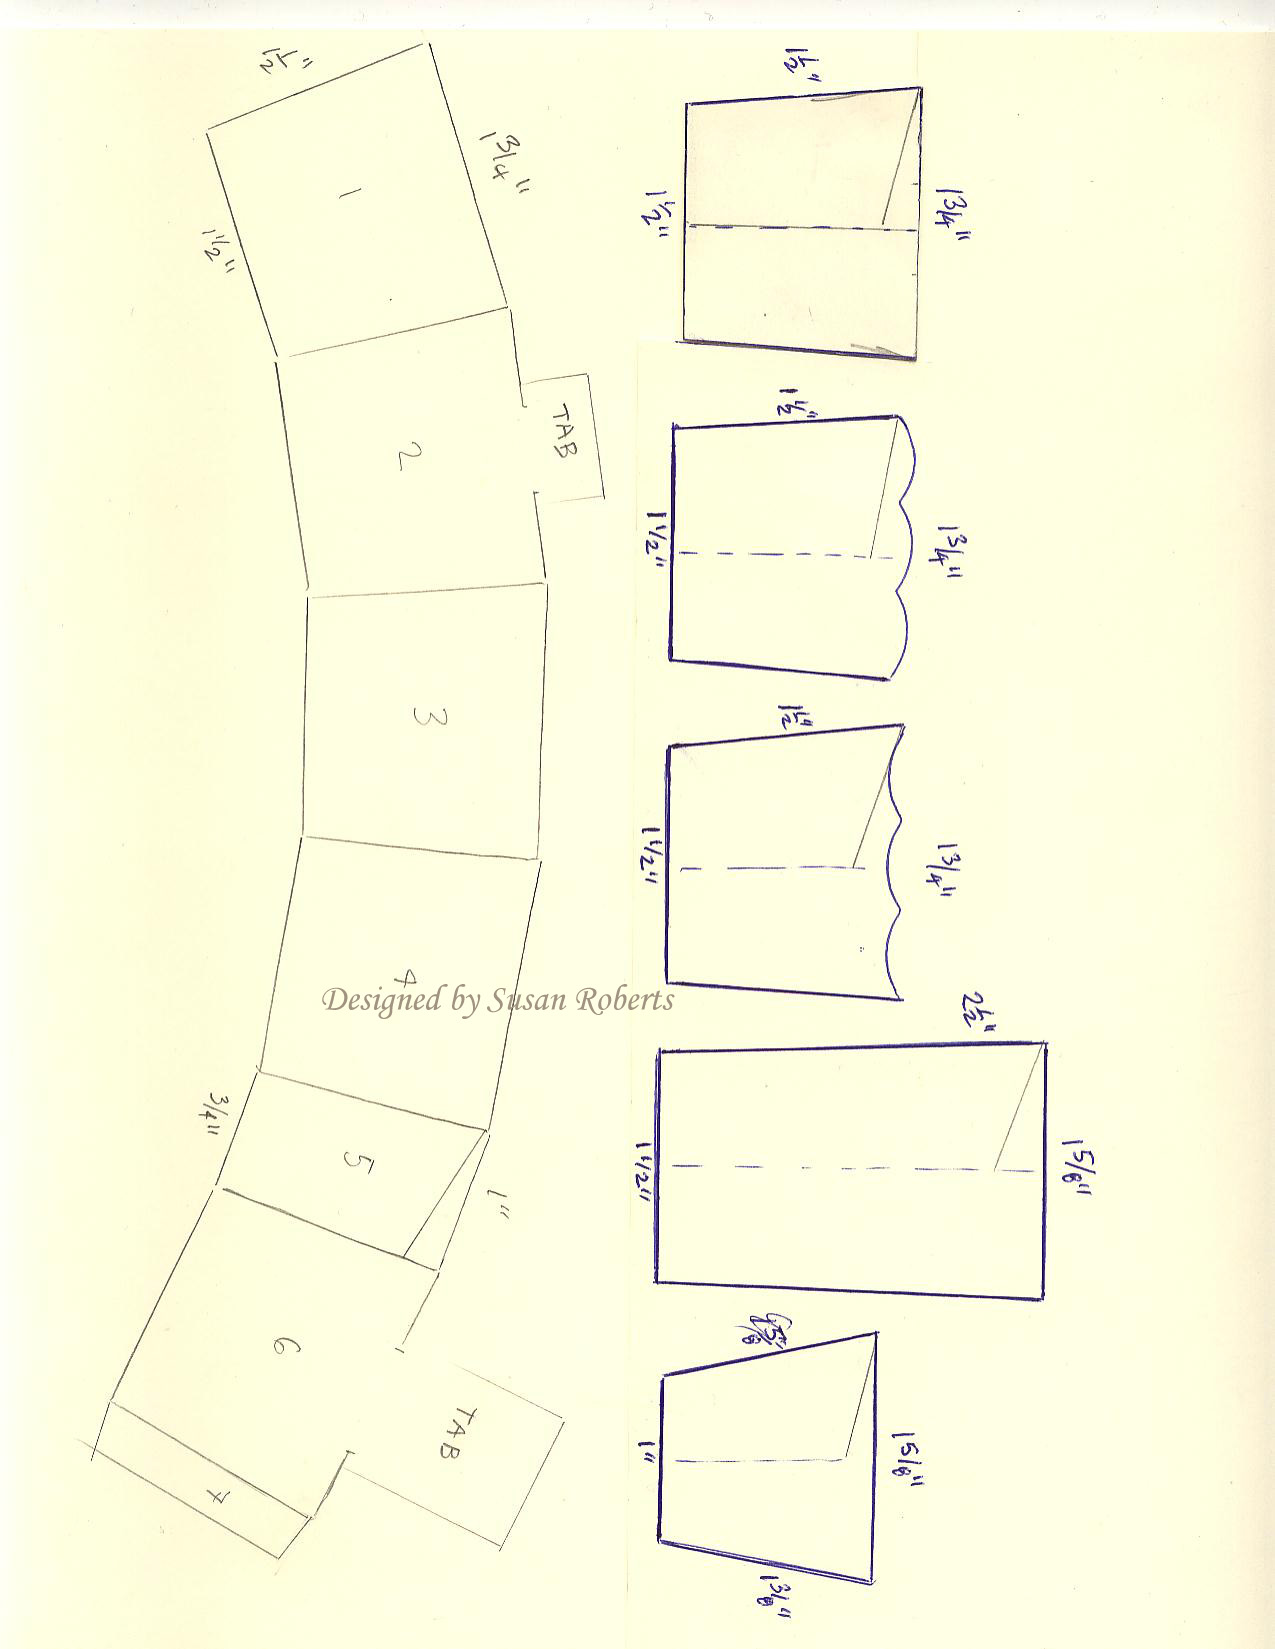
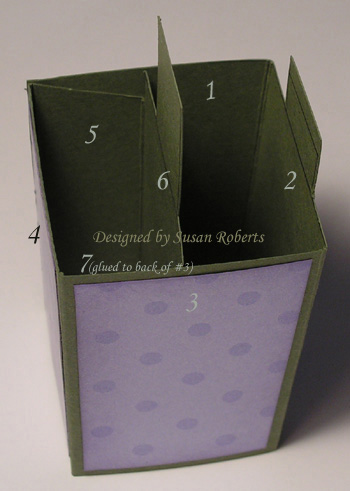
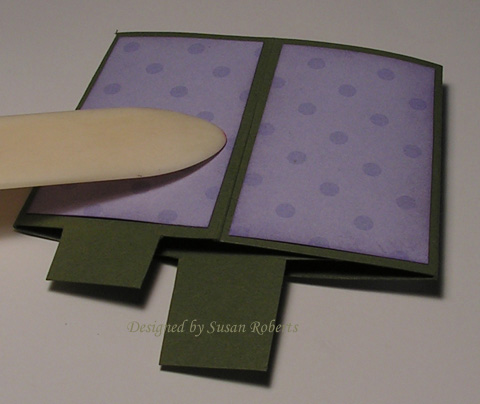
You will need to make and cut out a template of your desired basket shape. Then trace around it 4 times placing each one side to side. On the 5th section do only 1/2 (or a little less) of the basket shape. Then do one more full basket shape and finally a 7th section which is just a tab for gluing. This 7th section should be less than 1/2 the width of your template (and the same width or less of section #5). Be sure to add a couple of tabs on sections #2 and #6 with the #6 tab being a little taller. If you want to have three decorated sections, add another tab to section #4. This tab should be the tallest of the three as it will be the back row. Cut out your basket and score all the sides. Fold the basket so that the tracing lines will be on the inside of the basket.
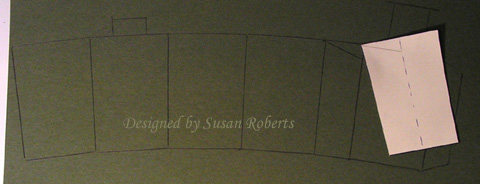
To add patterned paper, make another template that is 1/4″ less in height and width than your basket template. Trace 4 of this smaller basket shape on the back of whatever patterned paper you are using. (This step is optional. You can, of course, stamp images on the basket or even leave it plain.) Turn your cut out basket over so that all the tracing marks (if you have them like mine does…) and adhere your patterned paper to sections #1-4.
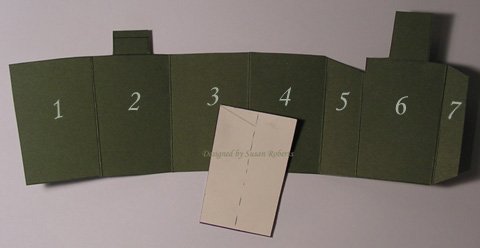
Apply adhesive to the outside of sections #5 and #7.
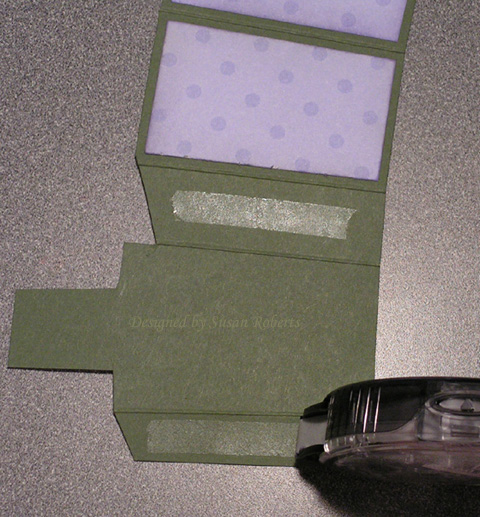
Adhere section #7 to the inside of section #3 to form a rectangle. (If section #7 is smaller than section #5, make sure it is glued on section #3 far enough away from section #4 so it equals the measurement of section #5 and forms a rectangle.)
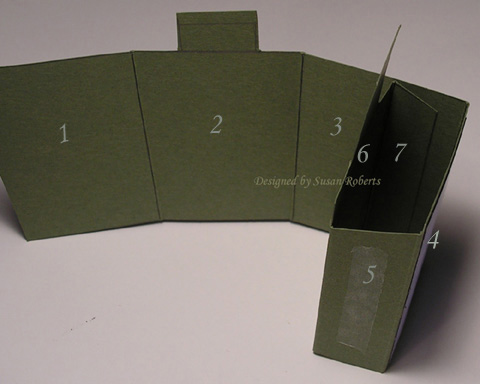
Adhere section #1 to the outside of section #5.
Make sure that your sections will fold flat for mailing.
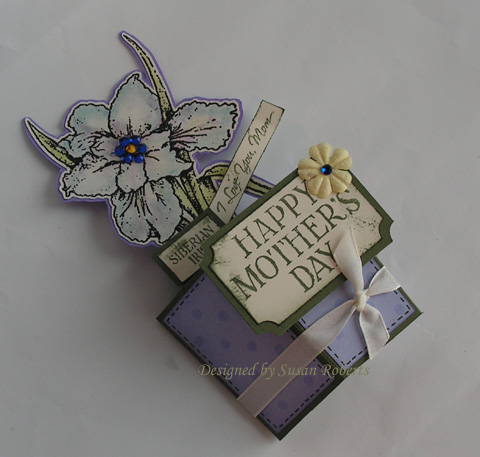
Decorate as desired!
Basket 1 – Celebrate
Stamps: “Siberian Iris” and “Many Sentiments” both sets from Flourishes
Papers: Always Artichoke, Very Vanilla, DP is SU! “Prints”
Inks: Jet Black Stazon, Always Artichoke Marker, Reinkers in Always Artichoke, Old Olive, So Saffron, Bashful Blue, Elegant Eggplant
Accessories: Eggplant GG Ribbon, Rhinestone Brad, Butterfly Punch
Basket 2 – Happy Mother’s Day
Stamps: “Siberian Iris” from Flourishes
Papers: Always Artichoke, Lavender Lace, Very Vanilla, DP is SU! “Prints”
Inks: Always Artichoke, Lavender Lace, Always Artichoke Marker, Versamark, Chalks in Lavender Lace, Almost Amethyst, Bashful Blue, Not Quite Navy, Always Artichoke, Old Olive
Accessories: Black Embossing Powder, Rhinestones, Prima, Very Vanilla Taffeta Ribbon, Ticket Punch
**These little baskets were designed using a folding technique from a card in my mother’s vintage collection. It was a Hallmark Historical Collection card and was a reproduction of a card printed in the late 1800’s by Raphael Tuck & Sons, London.**


wow, Susan – this is FANTASTIC! love how a card you put in an envelope will quickly turn into a 3-D item! lovely coloring of the flowers *thanks for visiting my blog on a regular basis, your comments are always so sweet & encouraging & I appreciate it* smile
Wow, wow, wow!!! What a design, what a 3D card! This is so COOL!!!
Your coloring is amazing!
Great tutorial!!! I love it!!! 🙂
Thank you!!
What a wonderful project! I love it! Thanks for sharing so many details!
Oh…my….word!! Let me get my jaw off the floor. Susan, these is just gorgeous! Looks like I’m going to take a peek at Flourishes.
Very elegant.
Oh my goodness Susan! These are beautiful! Fantastic job! Thank you so much for sharing how you made it. Beautiful work!
Wow! Thanks for the tutorial! I can’t wait to try…though I haven’t got any big flower stamps. I’m SURE I’ll find a good use for it though. 🙂
Susan – this is an awesome project and you’ve made it look fabulous!!! TFS
These are absolutely gorgeous!
OMG – what a fabulous, wonderful card! I just love how it folds flat for mailing and then pops right back out for display!!! Super, super job, Susan!!!
Wowza, what a great card…..I will have to look at the whole template more closely when I have time, but at first glance, this is one awesome card! Thanks for your time to put this all together!
LeAnne
You are amazing! Thanks for sharing this gorgeous project. Marta
This is fabulous!! The colours are fantastic. Thank you so much for the how-to!!
I can’t find the right words to describe this incredible creation! I am amazed! I love that Flourish Iris Stamp and you’ve just turned it into a must-have item! TFS a detailed and enjoyable tutorial! I love that you can mail this and turn it into a coversation piece. Nobody will ever throw a “card” like this away if they receive one! I’m awestruck, TFS!
At first I was not understanding why you needed 7 panels…then I saw it was so it would collapse…Brilliant!!! That is beyond amazing. Thanks so much for the time you put into making the template and directions. I will definitely be using this.
Charmaine
Susan, this is simply amazing and the fact that it folds neatly to put in an envelop is incredible. Your iris are colored so beautifully as well. I love this project for sure! Thanks for post the directions to make it as well. You rock!
Pinky
Wow these are so beautiful and I can’t believe they fold flat!! You are amazing!! TFS!
Cute baskets and great tutorial!
hahahaha this is so perfect!! Susan I came to your site today to copy and paste your URL site into an e-mail to send to my scraping/card making family members, only to find you have this amazing card on here! You are a sweet smelling genius (as opposed to a stinkin’ one!)!!!! Now I will have even more cache with my family for knowing such a brilliant card maker! Great tutorial too. Perfect, LOL!
Oh my gosh, Susan!!! What ingenuity here with the collapsable design!!! Totally fabulous!!! Your work with Siberain Iris is totally over the top!!! And thanks so much for taking the time to prepare this detailed and fabulous tutorial — what a great job!!! Thanks so much!!!
Incredible! Not only a beautiful card, but a ingenious template!
HOLY COW, Susan YOU GO GIRL!! these are sooo cool!
Oh my gosh…this is totally amazing and beautiful, Susan!! Thanks so much for sharing all of the details!! Wow!!
WOW Susan that is awesome! Your tutorial is wonderful an it is ingenious to make a 3D card. You are an VERY creative artist. I am truly honored that you did this wonderful project with Flourishes’s Siberian Iris. Thank you so much.
Polymer Hugs,
Jan Marie, 1flourish
Wow, Susan, this is fantastic! Just perfect!
That is sooooo amazing!!!! Just found your blog but will be back often I’m sure!!
TFS!
Vicky
This is just soooooooo beautiful!! I can’t stop looking at it! WOW!! Thanks for the tutorial I will have to try this:)
Dee
HOLY COW! This is totally amazing!!! Thanks for the tutorial! Wow!!
Wow! Awesome! What a cool project and beautiful use of the iris! Love the bejeweled centers!