There are still a couple of days left over at Flourishes to take advantage of their “Christmas in July” sale!  All Christmas sets are 15% off.

blog87withwm.jpg

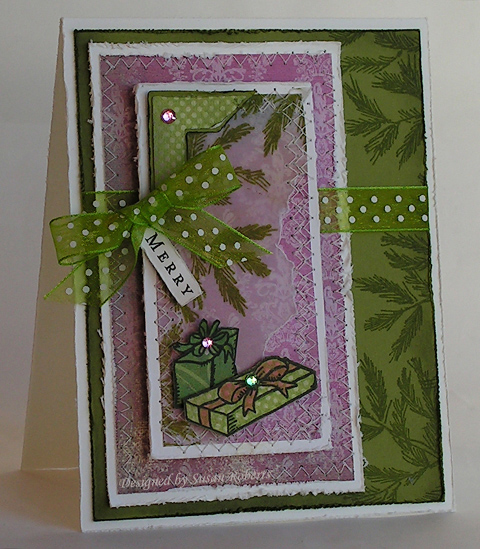
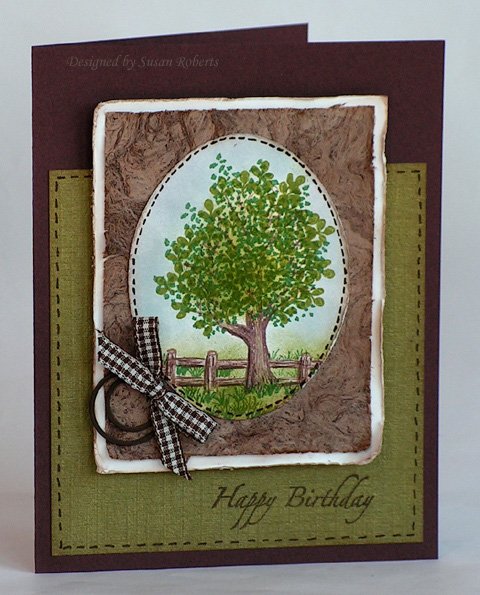
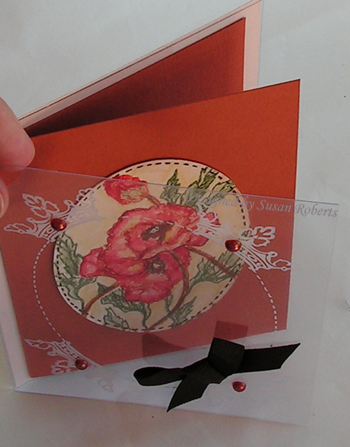
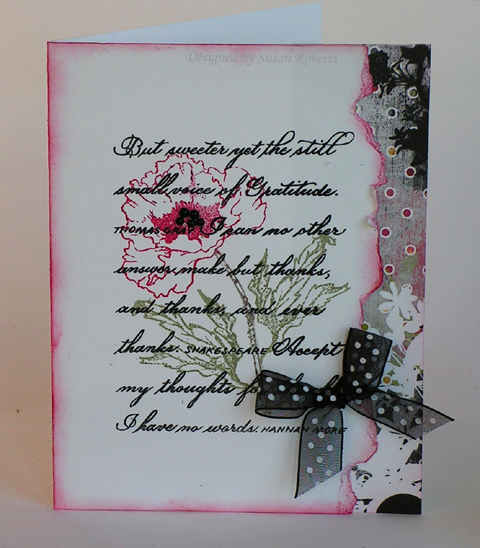
On this card I paper pieced, cut out and applied rhinestones to the two gift images from Flourishes “O Christmas Tree” set.  Using a marker, I colored in the bow on one of the gifts.  I used the Christmas tree image to stamp the pine boughs along the edge.  The sentiment is from the Flourishes Christmas set “Rejoice”.  All the designer paper is Memory Box’s “Sprout”.  I zigzagged all over the place with my sewing machine, and have to admit it was quite a bit of fun!  Plus the sewing holds the torn vellum securely in place.  That pretty dotted green ribbon is May Arts.

This card is also for a couple of the DTGD08 Challenges over on Splitcoaststampers.  If you are a Fan Club member you can check them out: DTGD08Julia and DTGD08Laurie.  You can play along and upload into the DTGD Galleries until August 30th!

I hope everyone is having a wonderful summer.  We have been enjoying such beautiful sunny weather here in the Pacific Northwest.  Well… until today.  It is pouring rain as I type this.  Do you think Mr. Sun saw my Christmas card and got confused?  *chuckle*  Sure hope our summer days are not over with just yet.  My sweet little (almost 4) twin granddaughters are coming to visit for a week in August.  We have lots of swimming in the lake and boating on the agenda.  So here’s to happy warm thoughts and Christmas. (Oh and Mr. Sun… the Christmas part is just at Flourishes!!)

——————————

Stamps: Flourishes “O Christmas Tree”, “Rejoice” (sentiment)

Papers: SU! Whisper White, Old Olive, Vellum; Memory Box “Sprout”

Inks: SU! Old Olive, Barely Banana and Markers in Old Olive, Pretty in Pink; Versafine “Onyx Black”

Accessories: Sew Machine, White Linen Thread, May Arts Ribbon, Kaiser Rhinestones, SU! Corner Punch

——————————

Oh a final note:  You know Jerri Kay Jimenez.. she is the fabulouso water color artist and, I am so happy to say, my friend.  Well Jerri Kay has just started a blog!  Believe me when I say you want to pay her a visit.  Her talent is incredible.  Take a moment (or hours if you can) to check out her beautiful work here.

Have you been playing along in the Dare To Get Dirty Challenges over at Splitcoaststampers?  I was so happy when Rose Ann asked me if I would be one of her sample makers for her adorable flap card challenge.  Of course I said, “Yes!”  This was so much fun!

blog86dtgdflapcardwithwm.jpg

I used Inque Boutique’s “Bella Flora” and “Phrases & Sentiments” sets.

The magnets that I had were not very strong, so I had to change the placement a little from Rose Ann’s tutorial.

blog86dtgdflapcardopenwithwm.jpg

Rather than have the bottom magnet under the inside sentiment panel, I placed it on the outside of the lower flap.  It was incorporated into the design by adding a flower image over it that I stamped on a thin piece of card stock.  I was able to cover the magnet on the underside of the upper flap, too, since these two thin pieces of card stock were the only things between the two magnets.  I decided I actually liked the magnets this way since the bottom one was no longer underneath the area where I might want to write a short note to the recipient.

I also played in Kittie’s challenge.

blog86dtgdkittiewithwm.jpg

Before leaving for CHA I ordered all of Kittie’s “Cause A Scene” stamp sets.  Well they were waiting for me when I got home.  So, I just had to play along in her challenge today!  This was the first that I had used these stamps and tried to make a scene.  So be gentle!  lol  It will definitely take some practice, but even my little itty bitty attempt here was a huge amount of fun.  I can tell I’m gonna like playing with my Kittie Kits.

I used Inque Boutique’s “Phrases & Sentiments” set for the sentiment.  The brown frame around the oval scene was a sample piece of hand pounded bark paper that I was given from the Amate Studios people at CHA.

—————————————

Flap Card

Stamps: Inque Boutique’s “Bella Flora” and “Phrases & Sentiments”

Papers: Chocolate Chip, Very Vanilla, Taken With Teal, Cameo Coral, K & Company DP

Inks: Timber Brown Stazon, Chocolate Chip Classic and Marker, White Gel Pen

Accessories: Decorated Brad, Rhinestones, Oval Punch, 3/4″ Circle Punch, Coluzzle Circle Template, Magnet

Scene Card

Stamps: Rubbernecker Kittie Kits “Cause A Scene”; Inque Boutique “Phrases & Sentiments”

Papers: Chocolate Chip, Whisper White, K & Company DP,  Amate Studios Hand Pounded Bark Paper

Inks: Chocolate Chip, Close to Cocoa, Garden Green, Old Olive, Soft Sky, Summer Sun

Accessories: Gingham Ribbon, Circular Clip

Jul 252008

I sure do wish there was time enough in the day to participate in all of the awesome Dare To Get Dirty challenges this week over on Splitcoaststampers!  Here is one that I did do.  It is for Julia S’s challenge.

blog85withwm.jpg

The “Victorian Dressmaker” set from Inque Boutique seemed liked the perfect set to use for this challenge.  I stamped the pattern piece images onto vanilla colored tissue paper, cut them out and either folded them or pinned them onto the designer paper.

blog85closeupwithwm.jpg

The little envelope was made using a mini envelope punch.  The black stitching is done in “freestyle”.  It’s my best bet when it comes to sewing as you don’t have to sew straight or precise lines.  Yup.. “freestyle” is me!

If you still haven’t checked out the DTGD 08 Challenges at Splitcoaststampers, be sure to do so.  They are so much fun!

——————————

Stamps: Inque Boutique “Victorian Dressmaker”

Papers:  SU! Very Vanilla, Basic Black; Vanilla Tissue Paper (from Eddie Bauer.. I throw nothing away!  lol); Basic Grey “Recess”

Inks: Tsukineko “Brillance Graphite Black”; SU! More Mustard Classic and Markers in More Mustard, Pretty in Pink, Cameo Coral, Apricot Appeal, Sage Shadow

Accessories: Mini Envelope Punch, Button Brads, Lace, Cording, Straight Pins, Sewing Machine, Black Linen Thread


Starting today and running through July 31st, Flourishes is having a sale on all of their Christmas Sets!!  There is no need for a code or coupon or anything.  The sale price is right there with each set.  Check them out!  What’s better than a sale!

blog84withwm.jpg

This card uses Flourishes “Flourished Christmas” set and backgrounder “Damask Reverse”.  The ribbon is May Arts.  The wonderful dotted lime green designer paper is Memory Box’s “Sprout”.  And the rhinestones are made by Kaiser.

Have you been over to Splitcoaststampers and played along in the Dare to Get Dirty 08 Challenges?  This is the second challenge that I have participated in.  It is for Jenn’s challenge.  It is also for today’s Sketch Challenge #186.

Have a great Wednesday everyone..  We’re halfway to the weekend!  Yeah!

——————————

Stamps: Flourishes “Flourished Christmas”, “Damask Reverse”

Papers: SU! Basic Black, Whisper White; Memory Box “Sprout”

Inks: Versafine “Black Onyx”

Accessories: Kaiser Rhinestones; May Arts Ribbon

Jul 222008

Have you heard about the Dare to Get Dirty 08 Challenges going on this week over at Splitcoaststampers?  Here is a card for Christine’s challenge.

9blog83withwm.jpg

This beautiful floral image is from Inque Boutique’s “Victorian Flourishes”.  The sentiment and background script are from Inque Boutique’s “French Fancy”.  It is watercolored with SU! reinkers.

I did something kinda fun with the sentiment on this card.

blog83a.jpg

Only part of it is showing on the card front.

blog83closeupsentiment.jpg

The other half is on the inside of the card.

blog83e.jpg

I used good ole Scotch tape to cover the part of the sentiment I didn’t want to stamp.

blog83b.jpg

After inking the sentiment, I removed the tape and stamped.

blog83c.jpg

blog83d.jpg

Quick and easy and there are no worries about any ink getting on the unwanted part of the sentiment.

Since this is such a simple layout, I added lots of dimension for more depth and to add interest to the card.  I love my corner punch!

blog83closeupcorner.jpg

Hope you can find some time to play along with the Dirty Dozen Design Team and Alumni in the Splitcoaststampers DTGD 08 Challenges this week!

9blog83withwm.jpg

—————————–

Stamps: Inque Boutique’s “Victorian Flourishes” and “French Fancy”

Papers: SU! Basic Black, Very Vanilla, Cameo Coral

Inks:  Versafine Onyx Black; SU! Reinkers Glorious Green, Certainly Celery, Cameo Coral, Creamy Caramel, Bashful Blue, Black Gel Pen

Accessories: Pearl Brad, Ribbon, Corner Punch, Aqua Painter

Jul 162008

I had been planning to make a card with my Crystal Clear Card Stock for some time.  However I hadn’t been inspired as to what exactly I wanted to do.  Then today as I was sitting somewhere “special” I happened to look at the picture hanging on my powder room wall.  (Yes, you can now guess where I was sitting!  *blushing*)

blog82acetateinspiration.jpg    blog82acetateinspirationcloseup.jpg

Oh my!!  That has been hanging there for at least 10 years, but only today did it become the perfect inspiration I had been looking for.  Guess that just goes to show you, you never know when or where inspiration will strike!  hehe

blog82acetatewithwm.jpg

The main image is stamped with Flourishes newly released “Poppy Patch”.  I watercolored it using SU! reinkers.

As I was making this card, I took a few pictures.  First I cut out an oval from some regular card stock and taped the frame to the back of the acetate for a guide.  (The acetate was a half sheet measuring 5-1/2″ X 8-1/2″.)  I made sure that the frame was placed on one side of the card stock so that when I scored and folded it (to make a regular 5-1/2″ X 4-1/4″ card) the image would be centered on the front.

blog82acetateoval1withwm.jpg

Next, using one of the crown images from Flourishes “Mardi Gras” set, I stamped one in each “corner” of the frame with White Stazon.  I then used a white gel pen to connect them with some faux stitching.

blog82acetateoval2withwm.jpg blog82acetateoval3withwm.jpg

Finally I taped the acetate card to a 5-1/2″ X 4-1/4″ piece of Blush Blossom card stock.  I made a smaller card from Really Rust card stock and taped that to the inside of the acetate card.  With the regular card stocks taped to both the front and back of the back section of the acetate card, no adhesive is visible.  The main image is adhered to the front of the smaller card inside the acetate one.

blog82acetateconstructionwithwm.jpg

Every Wednesday on Sharon Johnson’s Blog “No Time To Stamp?” she has a “May I Suggest” theme.  This week she has asked all of us on the Flourishes Design Team to get in the act, too, and give a suggestion of our own.  What I would like to suggest is that you consider the versatility and ease of the wonderful Flat Back Pearls.  I have put some copper pearls on this card today instead of brads.  I love brads, but with the clear card stock, they really are a problem.  What do you do with the metal fasteners?  They show through and there’s no easy way to prevent it.  But with the flat back pearls, “Voila”.  No problem.  They have a small little adhesive on the back so there is no need for any fasteners.  Just something to consider the next time you are using acetate or even making a one layer card.  The pearls are perfect for these, too, because there are no fasteners to show on the inside of the card either.

Check out the other design team’s posts today for more tips or suggestions:

Sharon Johnson

Leslie Miller

Julie Koerber

Faith Hofrichter

Linda Duke

Sharon Doolittle

——————–

Stamps: Flourishes “Poppy Patch” and “Mardi Gras”
Papers: Crystal Clear Card Stock (Acetate), Blush Blossom, Really Rust
Inks: White Stazon, Really Rust Classic and Reinkers in Really Rust, Ruby Red, So Saffron Always Artichoke, Marker in Chocolate Chip, White Gel Pen
Accessories: Copper Flat Back Pearls, GG Ribbon

———————

Just a note:  This may be my last post for awhile as I’m off to CHA!!  So please be patient with me.  I plan to have a laptop at the convention, but getting it hooked up may be an issue for my limited computer knowledge!  If I’m computerless, I will respond to your posts and emails when I return.  Hope everyone has a great week!

Jul 122008

In the past I’ve had to be content to just read about it.  But this summer..THIS WEEK!.. I’m going!  Where?  I’m going to the Craft and Hobby Association’s (CHA) Summer Convention and Trade Show in Chicago!!  And JustRite has asked ME to be one of their demos!!  I can hardly believe it!  Here is the little make ‘n take that I designed for the show.

justrite2finalwithwm.jpg

They are a pair of bridesmaid’s dresses made with little table favor boxes cut on an AccuCut.  I stamped Flourishes Damask background on vellum to create an overlay for the skirt.  The scalloped hem is punched with one of Martha Stewart’s border punches.   The dress bodice is Cuttlebug embossed with the Swiss Dots embossing folder.  The JustRite monogrammed tags use new centers to be revealed at CHA!!  The tags are cut and embossed with Spellbinders Circle Nestabilities.  I used the Stardust Clear Pen to color in the rings and dot the centers of the little flowers on the border.  The bands were first colored with a yellow marker.  The Dotted Sheer Ribbon and Pearls on the prima and on the scalloped hem can be found at Flourishes.

justritefinalcloseup.jpg

I think JustRite is really going to have an exciting booth with lots of fun make ‘n takes.. 9 in all!!.  They will be located in Booth #3309 and have 32 new products to introduce!!  Here’s the schedule of events.

Friday, July 18 — 9 – 11 a.m. — MICHELLE WOODERSON (Mish Mash)

Friday, July 18 — 1 – 3 p.m. — SHARON JOHNSON (notimetostamp)

Saturday, July 19 — 10 – 12 noon — TAYLOR VAN BRUGGEN (tayloredexpressions)

Saturday, July 19 — 1 – 3 p.m. — JERRI JIMENEZ (Jerri Kay)

Sunday, July 20 — 10 – 12 noon — SUSAN ROBERTS (rainy)  (ME!!)

And throughout the show the JustRite team will be conducting a bunch of fun projects.  To see all of the projects and read about each designer, check out the JustRite blog. They have a ton of sneak peaks over there, too!!

So if you are at the show, I would LOVE to meet you.  Please stop by to say “Hi” and have some fun playing with the fun new toys!!

Day three of Flourishes new releases brings me to my final set for July called “Poppy Patch”.  There have been some beautifully colored… oh so beautifully colored poppies shown by the design team members.  But today I want to show this stamp set with no coloring in at all.  These images are so beautiful.  I think they look simply elegant even standing all on their own.

blog80flourishespoppywithwm.jpg

I just inked up the images with my markers and stamped.  Quick and easy.. which I believe also qualifies this card for Sharon’s Stamp Simply Challenge.  Her challenge is to make a thank you card.  Since I again used that wonderful script background stamp from the new Flourishes “Thank You” set on my card, it works!
blog80flourishespearlscloseup.jpg
I added one of my favorite accessories some black flat back Pearls to the center of the poppy. The designer paper is Basic Grey’s “Scarlet’s Letter”. The ribbon is May Arts’ Sheer Polka Dot.

Be sure to visit the other Flourishes Design Team member’s blogs to see more of the new releases:  Sharon Johnson-No Time To Stamp?, Leslie Miller-Running With Scissors, Linda Duke-Works of Heart, Faith Hofrichter-Stampin’ w/Markie’s Mom, Julie Koerber-Out to Impress

Stamps: FLLC “Poppy Patch”, “Thank You”

Papers: SU! Whisper White; Basic Grey Scarlet’s Letter

Inks: SU! Rose Red, Old Olive; Versafine Onyx Black

Accessories: Pearls; May Arts Ribbon

———————

Okay if you have a queazy stomach you may not want to click on the picture below.  But I just HAVE to share.  It’s the whole proud mom thing goin’ on here.  lol  It’s my son.  He is in dental school and yesterday he called me very excited.  A milestone for him as he performed his first procedure that has to be performed by a doctor.  Everything he has done up until yesterday could also be performed by a nurse/dental assistant.  His “patient” is another dental student.  Yes!!  They practice on each other!  lol  He had his turn in the chair, too, and drove home with his mouth completely numb from all the injections!

blog80injections.JPG

I LOVE Fridays!!  Hope everyone has a great one!

Today’s card shows another one of this week’s new releases at Flourishes called “Thank You”.  It is this month’s Stamp Simply set and is unbelievably FABULOUS!!  I love the tulip images and the graceful elegant sentiments.  AND what about that script background?  Well I can’t put it down!

7blog79flourishesssthankyouwithwm.jpg

Using my SU! markers I inked up the tulip with Old Olive and Elegant Eggplant.  I colored in the flower with Lavender Lace.  It was so quick and easy.  (I need easy!)

blog79flourishesthankyoucloseup.jpg

I stamped a second tulip and cut out a portion of the flower and stem.  It is adhered at the stem and then popped up on the petals.  It adds a fun little bit of dimension to the flower.  The gorgeous ribbon, flat back pearl and Basic Grey designer paper can also be found at Flourishes.  The sentiment is part of the script background stamp.  What a wonderful set this is!!

Oh and don’t forget to visit the other Flourishes Design Team member’s blogs to see more of the new releases:  Sharon Johnson-No Time To Stamp?, Leslie Miller-Running With Scissors, Linda Duke-Works of Heart, Faith Hofrichter-Stampin’ w/Markie’s Mom, Julie Koerber-Out to Impress

Did you know that Julie is a finalist in the Paper Crafts Idol Contest?!?  If you haven’t already cast your vote, it’s not too late to do so.

———————

Stamps: Flourishes Stamp Simply “Thank You”, IBB

Papers: Whisper White, Lavender Lace, Elegant Eggplant, Old Olive, Basic Grey’s “Euphoria”

Inks: Lavender Lace, Elegant Eggplant, Old Olive

Accessories: Satin Ribbon, Pearl

blog78flourishesbutterflywithwm.jpg

Today is Flourishes Day!  Three new sets are being released, and each one is as wonderful as the next!  The butterfly on today’s card is from the new set called  “Butterfly Moments”.  The background script is from the new Stamp Simply set called “Thank You”.  I just love it!  The sets are so easy to use together even though each is distinctly different and unique.  How cool is that!  The third set is called “Poppy Patch”.  They are all just so beautiful!

For this card I first stamped the script background and the three butterflies that are around the border of the main panel.  They are colored with SU! markers.  I sponged and faux stitched around the panel.  I then put on a couple of beautiful May Art ribbons found here and here and gold cording.  Three more butterflies were stamped, colored, cutout and adhered to the card.  I applied flat back black pearls to them.  Lastly I added a prima, another pearl and a corner accent.

blog78flourishesbutterflycloseup.jpgBe sure to visit the other Flourishes Design Team member’s blogs to see more of the new releases.  Then head on over to Flourishes to get these wonderful sets!

Sharon Johnson
No Time To Stamp?

Leslie Miller
Running With Scissors

Linda Duke
Works of Heart

Faith Hofrichter
Stampin’ w/Markie’s Mom

Julie Koerber
Out to Impress

Julie hosted her first Motivate Me Mondays challenge on Monday (of course!) in the FLLC Forum.  You can play along anytime during the whole week.  Did you know that Julie is a finalist in the Paper Crafts Idol Contest?!?  Voting begins today.

Also in the FLLC Forum, Faith hosted a Flourishes Tuesday Challenge.  (I think it was yesterday on Tuesday… okay okay j/k OF COURSE it was yesterday on Tuesday!!  lol)  And again, you have all week to play!  Check out these fun challenges and play along if you can!

***Oh yes and there’s just one more thing.  The winner of my blog candy is Post #20 Diane Lapointe!!  I will email you so that you can send me your address!  Congratulations!!  Hope you have tons of fun with your new set!***

Stamps: Flourishes “Butterfly Moments” and “Thank You”

Papers: Very Vanilla, Basic Black, Whisper White

Inks: Versafine “Onyx Black”, More Mustard and Markers: Really Rust, Summer Sun and Yoyo Yellow, Stardust Clear Glitter Pen, Black Gel Pen

Accessories: May Art Ribbon, Pearls, Cording, Prima, Corner Punch

© COPYRIGHT © and FTC Declaration

All content on my blog is COPYRIGHT © 2008-2024 Susan Roberts. Please don't copy any of my stuff for publication, design or contest submission. I declare that I sometimes promote and/or endorse products that I currently receive or have received either for free or at a discount. That said, I won't ever recommend anything that I don't personally enjoy using or feel is a quality product.
© 2020 Rainy Day Creations Suffusion theme by Sayontan Sinha