Jun 282012

It’s still June and that means more weddings!  Here is the shower card that I made for our neighbor’s daughter, Samantha.

And here is her wedding card.

I knew that Sam’s reception was going to have a very vintage feel to it as she borrowed several Victorian/vintage items from my home to use on her table settings!  So the cards were made with lace and pearls and doilies and lots of yummy fun stuff.

Happy forever, Sam and Bryan!!

There are still a couple of days left on my current sketch challenge!  You can check it out HERE!!

——————————

Shower Card:

Stamps: PTI “Sign Language”; SU “Hello, Doily”

Papers: PTI Vintage Cream

Inks: SU Chocolate Chip; VersaMark

Accessories: Kaiser Pearls “Champagne”; Clear Embossing Powder; Martha Stewart Scoring Board; Silver Heart “Love” Charm; Organdy Ribbon; Silk Flowers

Wedding Card:

Stamps: Artful Inkables “Wedding Silhouettes”; SU “Teeny Tiny Wishes”

Papers: PTI Vintage Cream and Dark Chocolate; Crate Paper “Portrait Collection” Designer Paper

Inks: SU Chocolate Chip

Accessories: EK Success Jolee’s Boutique Lace Bow; Half Pearls; PTI Parisian Lace Doily Die and Punch Out Tool; Nestabilities Classic Circle Dies

I made a butterfly mobile for my newest granddaughter’s nursery and am sharing it over at the CLASSroom.

Hope you’ll join me there.  Happy Crafting!

P.S.  Did you know that I have a sketch challenge going on until the end of the month?  Check out the sketch along with the blog candy that will go to the winner HERE!

Jun 222012

The cards today were made for my two married sons.  Notice the black screw brad on the first card.  It was originally silver but was colored with a Black Copic Marker.  Worked like a charm!  And even though they were both made as Father’s Day cards, with a simple change of the sentiment I think they would work well for other masculine occasions such as a birthday.

Here is the inside of Jeff’s card.

Card #2 was for Gary.  With a wife and three daughters… well he really is the king of the castle!

Wouldn’t it be easy to make this a birthday card!

Just have to share my latest picture (it’s what Grandma’s do!) of little Kira with her daddy.  Love it.

Oh, and if you haven’t seen my latest sketch challenge and blog candy stamps from Memory Box, check it all out HERE!

Happy Crafting!

——————————

Jeff’s:

StampsStamper’s Anonymous “I See Paris”, “The Journey”, “Soulful Journey” , “Elements of Time” and “Mini Muse” ; Inkadinkado “Happy Father’s Day”

Papers: PTI Select White and True Black; Authentique “Loyal” Collection Designer Paper; My Mind’s Eye Indie Chic “Nutmeg” Designer Paper

Inks: Memento Tuxedo Black; SU Close to Cocoa and Not Quite Navy; Copic

Accessories:  Grosgrain Ribbon; Silver Screw Brad (Colored with Copic)

Gary’s:

Stamps: Crafty Secrets Clear Art Stamps “Favorite Fellas”

Papers: PTI Select White and True Black; Kaiser Craft “Technologic” Designer Paper

Inks: Memento Tuxedo Black; SU Real Red

Accessories: Nestability Classic Circle Die; 1-3/4″ Circle Punch

I loved the sketch from Waltzing Mouse Stamps this week and the cute bathing suit to be used as inspiration for Splitcoaststamper’s Clean and Simple Challenge .  So I made a quick and fun card that includes them both.

When you open the card…

a little more of the sentiment is on the back of the tag.  Isn’t that fun!

If you haven’t seen my latest sketch challenge and blog candy stamps from Memory Box, check it out HERE!

Thanks for dropping by today.  Happy Crafting!

——————————

Stamps: Waltzing Mouse Stamps “Teeny Trees”

Papers: PTI Select White; Memory Box “Viola” Designer Paper

Inks: Memento Tuxedo Black

Accessories: Lace; Fleurettes II; Brad; Nestabilities Classic Circles Die

The Rainy Day Sketch Challenge last month was SO FUN!  I was excited that there were actually some takers!  Woohoo!!  So… I’ve made another sketch to play with for this month.

Here is my take on the sketch.

I love this silhouetted “Cattail Birds” image from Memory Box.

So for some blog candy, providing there are some challenge takers, this sweet image along with a Memory Box “Orchard Bird Combo” stamp will be given to the winner.  Notice the little flower image on the side of the wood mount in addition to the main image on the “Orchard Bird Combo” stamp.  This creates so many great possibilities and variations with just a single stamp.

If you do decide to play along, leave a link to your creation in the comments section.  Provided there are some entries, a winner will be selected on July 1st giving you a little over 2 weeks to play.  Oh and please make sure that the link you leave goes to the specific card you are entering and not to your blog or gallery in general.  Hope you can find some time to play!

The Sketch Challenge is now closed.

HAPPY CRAFTING!!

——————————

Stamps: Memory Box “Cattail Birds” and “Orchard Bird Combo” (pictured only); PTI “Birthday Basics”

Papers: PTI Vintage Cream and Dark Chocolate; My Mind’s Eye Indie Chic “Nutmeg”

Inks: SU Chocolate Chip, Always Artichoke and Not Quite Navy

Accessories: Grosgrain Ribbon; Linen Thread


Jun 112012

Needed a “thank you” for a sweet lady in my life and thought this image was just right for her.

Although colored with Copics, parts of the image were highlighted with a white gel pen.  I really like this effect.

And speaking of “sweet”, I’ve just returned from spending the past week in Vegas getting to know my newest little granddaughter.  She is just so precious.  And her big sisters adore her.  One of the twins, according to their dad, started crying the first time she held Kira.  Looking at her little sister she said, “I just love her so much.”  Melts my heart.

Thanks for dropping by today!

——————————

Stamps: SU “Every Moment” and “Pocket Silhouettes”

Papers: PTI Select White; SU Chocolate Chip and “Twitterpated” DSP

Inks: Memento Tuxedo Black; White Gel Pen; Copics:

Accessories: Pearl; Twill Ribbon; Nestabilities Classic Rectangles Dies; SU Square Lattice Embossing Folder

For Father’s Day last year I designed a shirt and tie card. Well using this same idea, I’ve created a shirt and tie tote.  This will be filled on Father’s Day with a sweet surprise.  However, this tote will comfortably hold 3 or 4 moderately embellished A2 sized cards with envelopes, if you’d rather that than chocolate!

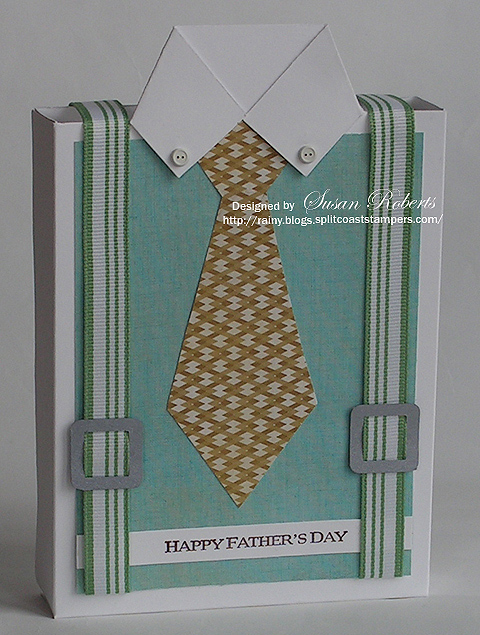
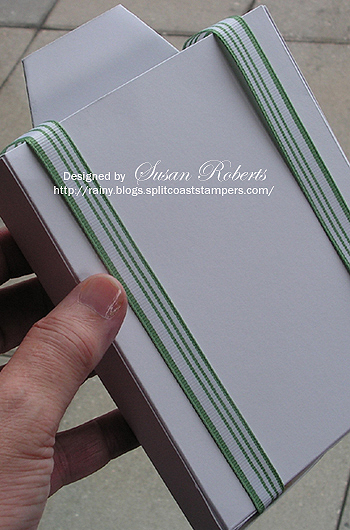
I love suspenders, but I’ve never been able to convince my DH to wear them.  Wonder if he’ll even notice them on this little creation. Kinda hard to miss ’em?  They carry all the way down the back of the tote as well.

Following is a tutorial for the tote, but first I wanted to announce the winner of my Sketch Challenge.  I was SO excited that some of you played along!!!  How cool is that.  I didn’t use a random generator this time, but instead just wrote your names on some slips of paper, put them in a bowl, closed my eyes and picked one.  Congrats, Carol L!  I’ll get that gorgeous Graphic45 paper out to you asap!

INSTRUCTIONS FOR A FATHER’S DAY TOTE

Step 1

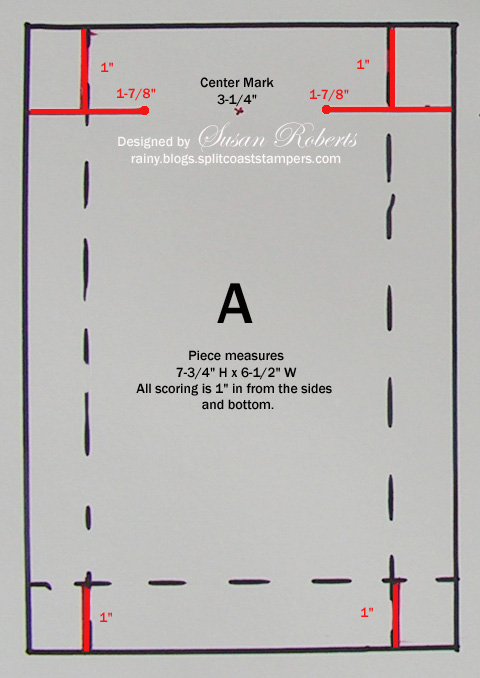
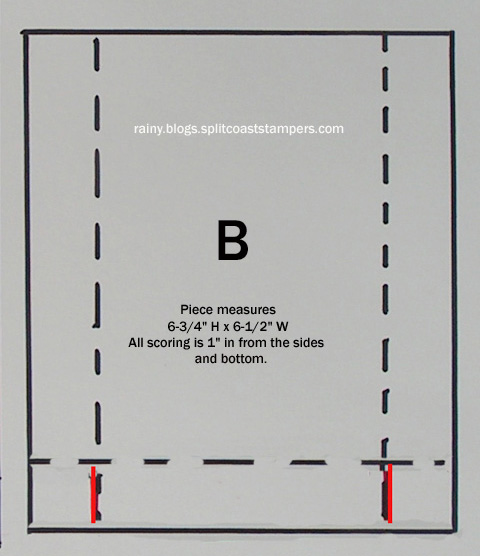
Cut 2 pieces of cardstock A and B.

Piece A  =  7-3/4” x 6-1/2”

Piece B  =  6-3/4” x 6-1/2”

Step 2

Piece A – Score in 1” from both long (7-3/4”) sides.  Score in 1” from one of the short (6-3/4”) sides.
(This side will now be referred to as the bottom of Piece A and the opposite short side will be referred to as the top.)

Piece B – Score in 1” from both long (6-3/4”) sides and 1” from one of the short (6-1/2”) sides.
(This side will now be referred to as the bottom of Piece B.)

Step 3

Piece A – Measure down 1” from the top and 1-7/8” from both sides and lightly mark this spot.  From 1” down on the sides, cut in 1-7/8” to that mark.  Cut down 1” from the top on both score lines.  This will completely cut away a 1” square from both corners of the top.  Cut up 1” from the bottom on both score lines.

Piece B – Cut up 1” from the bottom on both score lines.

Cutting lines are in RED.

Step 4

Follow the instructions on THIS TUTORIAL to make the collar and tie.  Note, however, that the “center” should be marked at 3-1/4” (not 2-1/8” as given in Step 3 of the card tutorial.)

Decorate and embellish each piece as desired.

Step 5

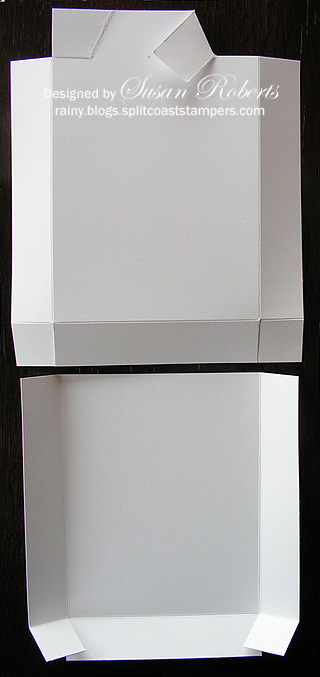
Assemble the tote by folding all the scored lines in the same direction and towards what will be the inside of the tote.  Adhere A and B together on the overlapping side and bottom pieces.  Make sure that Piece A is on the outside of Piece B.

Happy Crafting!

——————————

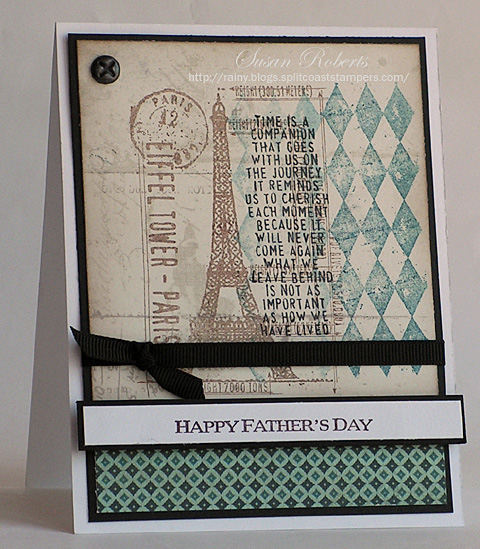
Stamps: Inkadinkado Happy Father’s Day

Papers: PTI Select White; SU Silver; My Mind’s Eye “Indie Chic ‘Nutmeg'”

Inks: SU Chocolate Chip

Accessories: Button Brads, Grosgrain Ribbon; Buckle Punch

© COPYRIGHT © and FTC Declaration

All content on my blog is COPYRIGHT © 2008-2024 Susan Roberts. Please don't copy any of my stuff for publication, design or contest submission. I declare that I sometimes promote and/or endorse products that I currently receive or have received either for free or at a discount. That said, I won't ever recommend anything that I don't personally enjoy using or feel is a quality product.
© 2020 Rainy Day Creations Suffusion theme by Sayontan Sinha